Handwriter User's Manual
This document describes how to quick start Handwriter.
Version 1.0.1
Handwriter applies handwriting-like appearance effect to Text components and Image components in your scenes!!
- Very intuitive and easy to use editor window
- Simple runtime script components
- Overlay, Camera and World canvas on Unity GUI supported
- No program code needed to use
- OTF and TTF format font file supported
- Simple sprite and sprite sheet support
- Writing progress callback using unity event system
- Writing position feedback event system
- Built-in(Default, Standard), Universal (URP), High Definition (HDRP) render pipeline compatible
- Mobile ready
Technikcal details
Unity Compatibility Requires at least Unity 2019.4 (LTS)
- Handwriter User's Manual
- Introduction
- Handwriter Editor Window
- Text Handwriting
- Image Handwriting
- Special Feature
Introduction
Parimary Assets : Author and Book
Handwriter outputs two kind of assets derived from Scriptable Object.
These are Author asset and Book asset.
Author is used only in Unity Editor, and used to create Book asset.
Book is used on runtime script component in built executable.
Handwriter Editor Window
Open Handwriter Window from main menu as below.
Window > Handwriter


Basic procedure of both Text Handwriting and Image Handwriting are almost the same.
Please refer to different section for each component type you want to use.
Text Handwriting
Step 1: Create a new Author
Click the New Text Set button and open the select font window.
Click the object field and select a font file you want to use.
TTF or OTF format font files are supported.
Step 2: Add a character to the Book
Type a character you want to add, and click "+" button at the right of the field.

Handwriter Window automatically shows Stroke Order Setting Tab and show strokes setting of the added character.

Once, click the Handwriting Asset tab on the top of the window. You can find the added character in the list at the bottom of the window.
Click the added character in the list, then you can move to Stroke Order Setting tab.
Step 3: Add strokes to the character
In the Stroke Order Setting Tab, click the big + button of the window.
Then the Edit Stroke Window will open.
3-1 Mask a part of the stroke

You can find the character you typed.
Then move mouse pointer over the character, and click left button and drag. A part of the character will be masked by red color.
Continue dragging and fill the part of first stroke order of the character.
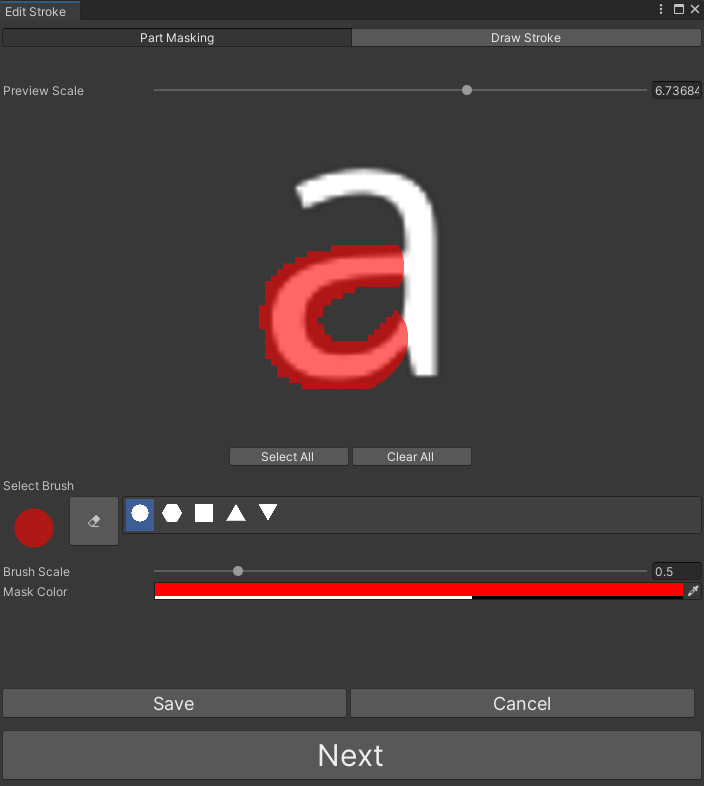
After filled, click the Next button placed bottom of the window.
3-2 Trace along the mask
Trace the masked part of the character with the mouse dragging.

Then click the preview button. You can check the drawn stroke.

If a good stroke drawn, click the Save and Exit button. Then the drawn stroke will be backed up as some textures.
Max total writing frames per one character is 765 (255 * 3).
3-3 Repeat until finish all strokes
You can find the added stroke in Stroke Order Setting tab in the Handwriter Window.
Repeat adding strokes until all strokes written.

After all strokes written, back to the Handwriting Asset tab.
And add all characters you want to type in Text component to the list and create each strokes.
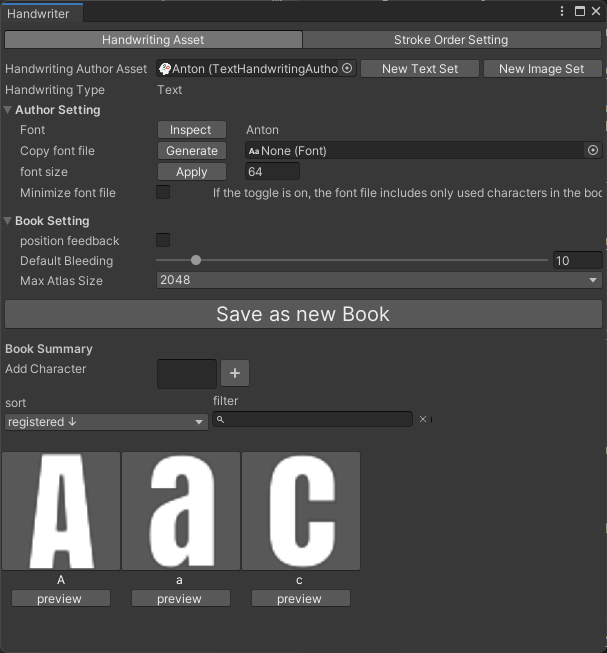
Step 4: Set Output Properties
Set properties in the Handwriting Asset tab.
Author Setting
| Property | Type | Desciption |
|---|---|---|
| Font | Font | Selected font file when Author created (can't change) |
| Copy font file | Font | Copy original font file to prevent any changes to the original file |
| font size | float | Font size of imported font file |
| Minimize font file | toggle | If toggle is on, font importer setting of target font file is set to "Custom Set" and only added characters to the book will be imported |
Book Setting
| Property | Type | Desciption |
|---|---|---|
| position feedback | toggle | enable Position Feedback event on Handwriter components. Please refer to Position Feedback section |
| Default Bleeding | int | defalut value of Ink bleeding on Handwriter components |
| Max Atlas Size | enum | Max texture size of packed stroke order texture |
Step 5: Save as a new Book
After all characters added, click the Save as New Book button of the Handwriting Asset tab. Select the folder you want to save the Book.
Once a Book created, if you update some character strokes, click Overwrite Book button and update Book asset.

Red circle apeears on Overwrite button if there are any update in Author.
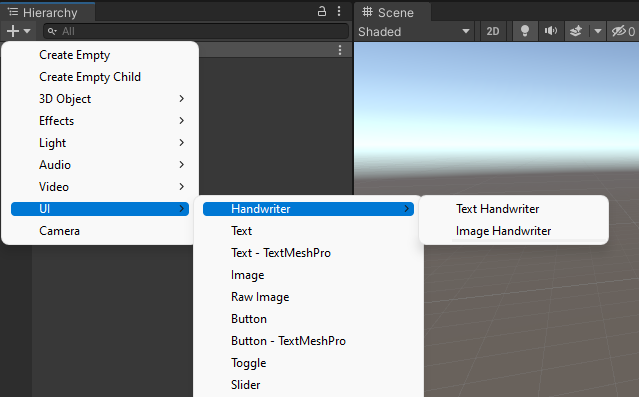
Step 6: Create object in your scene
Right click on your scene and select TextHandwriter
UI > Handwriter > TextHandwriter

A GameObject will be created under a Canvas (if there are no canvas in the scene, a new Canvas will be created) that has Text component and TextHandwriter component.

I recommend to create new Canvas for a new Handwriter component. Because currently Handwriter uses UV1~UV3, so automatically add UV1~UV3 channels to setting of root Canvas.
Step 7: Set created Book
Click Text Handwriting Book property of the created Text Handwriter component.
And select created Book asset.
Step 8: Set Runtime Properties
Set each properties in the added component.
8-1 Base Setting
| Property | Type | Desciption |
|---|---|---|
| Text Handwriting Book | TextHandwritingBook | Created Book asset |
| speed | float | writing speed in runtime. (multiplies each stroke speed). If speed is 1, 60 frames per a second |
| bleeding | float | Ink bleeding |
| Minimum Alpha | float | Alpha Transparency value before written |
| Position Feedback | toggle | Toggle on if you want to receive position feedback event. Please refer to Position Feedback section |
| Auto Start | toggle | Start writing automatically at Start() callback in MonoBehaviour lifecycle |
| auto start delay | float | Delay seconds before auto start |
| auto fade out | toggle | Fade out automatically after finish writing |
| fade out time | float | Fade out time |
| destroy game object after fadeOut | toggle | Destroy the GameObject after auto fadeout |
8-2 Event Listener Setting
Create your custom script and Event Listener functions. Please refer API Reference.
Image Handwriting
Special Notice on Image Handwriting
In Unity, sprite importer setting has "Mesh Type" property that can be found in inspector. Currently, Image Handwriting supports only "Full Rect". Automatically change that property of the sprite added to a Author.

Step 1: Create a new Author
Click the New Image Set button and open the select directory window.
And select directory to save new Author.
Step 2: Add a sprite to the Book
You can find the added character in the list at the bottom of the window.
Click the added sprite in the list, then you can move to Stroke Order Setting tab.

Step 3: Add strokes to the sprite
In the Stroke Order Setting Tab, click the big + button of the window.
Then the Edit Stroke Window will open.
3-1 Mask a part of the stroke

You can find the sprite you selected.
Then move mouse pointer over the image, and click left button and drag. A part of the image will be masked by red color.
Continue dragging and fill the part of first stroke order of the image.

After filled, click the Next button placed bottom of the window.
3-2 Trace along the mask
Trace the masked part of the image with the mouse dragging.

Then click the preview button. You can check the drawn stroke.
If a good stroke drawn, click the Save and Exit button. Then the drawn stroke will be backed up as some textures.
3-3 Repeat until finish all strokes
You can find the added stroke in Stroke Order Setting tab in the Handwriter Window.
Repeat adding strokes until all strokes written.
After all strokes written, back to the Handwriting Asset tab.
And add all sprites you want to show in Image component to the list and create each strokes.
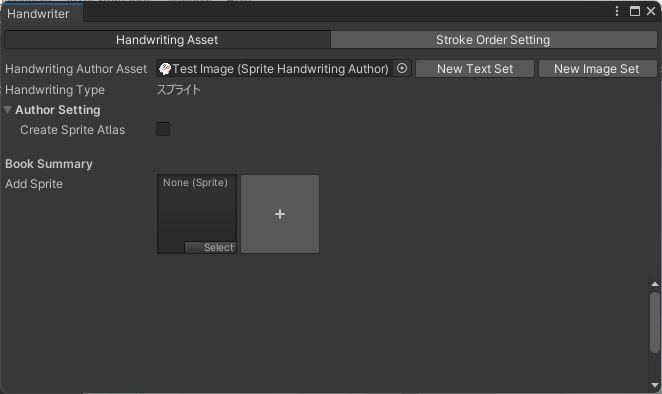
Step 4: Set Output Properties
Set properties in the Handwriting Asset tab.
Author Setting
| Property | Type | Desciption |
|---|---|---|
| Create Sprite Atlas | toggle | Create sprite atlas as sub asset of the book |
If Create Sprite Atlas options is on, "Sprite Packer" Mode setting in the project setting window automatically be changed to "Always Enabled".
Book Setting
| Property | Type | Desciption |
|---|---|---|
| position feedback | toggle | enable Position Feedback event on Handwriter components. Please refer to Position Feedback section |
| Default Bleeding | int | defalut value of Ink bleeding on Handwriter components |
| Max Atlas Size | enum | Max texture size of packed stroke order texture |
Step 5: Save as a new Book
Click the Save as New Book button of the Handwriting Asset tab. Select the folder you want to save the Book.

Once a Book created, if you update some sprite strokes, click Overwrite Book button and update Book asset.

Red circle apeears on Overwrite button if there are any update in Author.
Step 6: Create object in your scene
Right click on your scene and select SpriteHandwriter
UI > Handwriter > SpriteHandwriter
A GameObject will be created under a Canvas (if there are no canvas in the scene, a new Canvas will be created) that has Text component and SpriteHandwriter component.

I recommend to create new Canvas for a new Handwriter component. Because currently Handwriter uses UV1~UV3, so automatically add UV1~UV3 channels to setting of root Canvas.
Step 7: Set created Book
Click Sprite Handwriting Book property of the created Sprite Handwriter component.
And select created Book asset.
Step 8: Set Runtime Properties
Set each properties in the added component.
8-1 Base Setting
| Property | Type | Desciption |
|---|---|---|
| Sprite Handwriting Book | SpriteHandwritingBook | Created Book asset |
| select sprite int book | select | Sprite to show in the component |
| speed | float | writing speed in runtime. (multiplies each stroke speed). If speed is 1, 60 frames per a second |
| bleeding | float | Ink bleeding |
| Minimum Alpha | float | Alpha Transparency value before written |
| Position Feedback | toggle | Toggle on if you want to receive position feedback event. Please refer to Position Feedback section |
| Auto Start | toggle | Start writing automatically at Start() callback in MonoBehaviour lifecycle |
| auto start delay | float | Delay seconds before auto start |
| auto fade out | toggle | Fade out automatically after finish writing |
| fade out time | float | Fade out time |
| destroy game object after fadeOut | toggle | Destroy the GameObject after auto fadeout |

8-2 Event Listener Setting
Create your custom script and Event Listener functions. Please refer API Reference.
Special Feature
Position Feedback
Handwriter components can notify positions of the edge of writing character or image as some RectTransform objects. You can use these positions with other GameObject (Particle, indicator Sprite image, and so on), also 3D animation with IK. Thereby it will be looked like really written characters.
1. Enable the option in Author
In the Handwriter window, select a Author and open the Book setting. Toggle the Position Feedback checkbox option on and click the Overwrite button.

2. Enable the runtime components option
In a game scene, select a Handwriter compoent GameObject and see Inspector window. Toggle on the Position Feedback checkbox option.
If you find Error as below, check the option of Author is on.

3. Write a Event Listener
Write a OnStrokePosition callback function of Event Listener on your Script. Please refer to the API Rerefrence .
4. Set Event Listeners
Attach a event listener script to something. Then in Handwriter components inspector, attach the OnStrokePosition Event Listener to the property.
Smooth Chaining
Handwriter separates each strokes in a character completely. But actually these are gradually continuous data in binary. If the Smooth Chaining option is on, Handwriter deal continous stroke as one stroke.
This feature is useful in a case of writing 'e', 'o', and so on.
These character is return to the start position in one stroke. If you write as one stroke on StrokeEditor window, you can't write clearly the start position of these character as you want.
In these case, split a stroke into two strokes as below.
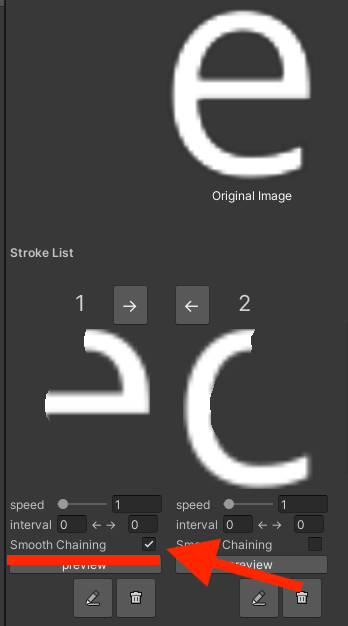
And check the Smoothe Chaining option in first stroke and toggle on. Then Handwriter consider these strokes as one stroke and affects Ink bleeding.